Montag, 29. Dezember 2008

Eggplant in Tomato Sauce (Patlıcan Bastırma)

Even though this dish may not look appealing, it does taste great. It is also very healthy as it involves a nutritious vegetable; eggplant. This dish was one of my least favorite dishes when I was a kid. Now, I truly enjoy it.

Eggplants are not in season now, however they are still available in stores. This dish is a very popular summer dish, but there is no reason why you couldn't make it in the winter if you find the eggplants. This recipe has been waiting to be posted since this summer as it was competing with other scrumptious recipes. Now is its turn.

You have the option of making this dish with meat. Most of the time, I cook the vegetable stews without meat. If you choose to add meat, sauté the meat, prior to adding the rest of the ingredients. For this particular dish, the eggplant can be substituted with okra, zucchini, green beans and even potatoes.


5 medium eggplants
3 small tomatoes (peeled and chopped)
¼ white or yellow onion (chopped)
1 large garlic clove (chopped)
2 tbsp olive oil
1 tsp tomato sauce
Pinch of salt and ground black pepper
1 cup water

Prepare a large pot filled with salty water for the eggplants. Peel the eggplants in half to one inch stripes leaving the peel lengthwise on four sides of the eggplant. The peeled section and unpeeled section of the eggplant will be alternating. Cut the eggplants in half. Take each half and slice diagonally in bite sized pieces. Immediately place in salty water to prevent discoloration.

In a large pot, heat olive oil. Add the chopped onions and garlic and sautee for 2-3 minutes. Add the tomatoes. Dissolve the tomato sauce in the water and add to the pot. Sprinkle salt and pepper as much or as little as you want. Stir and cover. Cook on low heat for 40 minutes. The eggplants should be soft when finished cooking. Serve with rice or bulgur pilaf.


Add to Technorati Favorites

Montag, 22. Dezember 2008

Stuffed Chicken Breast (Tavuk Göğsü Dolması)

I had the pleasure of making these chicken breasts for the first time for company we had a while ago. As I enjoy cooking, I enjoy sharing the food I cook even more. These chicken breasts turned out very flavorful and moist. This dish is made Turkish style even though one of the ingredients (Pepper Jack cheese) is not traditionally Turkish. I used this cheese since I did not want to add too many spices, but still have a nice flavor. This cheese already has some peppers in it, so the combination with mushrooms and parsley produces an exquisite taste. If you prefer, you may substitute the cheese with another type of cheese.


8 boneless skinless chicken breasts
6 large white cap mushrooms
1 garlic clove
¼ cup parsley
½ lb pepper Jack cheese
3 tbsp olive oil
1 tsp dried oregano
Juices of 2 lemons
Salt

Cut the mushrooms in half and slice. Cut each slice in three pieces. It is faster to cut a mushroom in half and slicing each half and without separating the slices chopping it again.

Heat 1 tbsp olive oil and add the garlic. Add the mushrooms, oregano and salt. Adjust salt to your taste. When the mushrooms become soft (after 5-6 minutes), add the parsley. Remove from heat and let cool.

Slice the cheese in ¼ of an inch in thickness and in the size of 1 square inch. Take each chicken breast and remove the fat that is around it. With a sharp carving knife slit an opening in the middle of the thicker side of the chicken breast. Using that opening, slowly and gently cut through the chicken breast without cutting an opening on the sides. Place 2 pieces of the sliced cheese in the breast. Add to a spoonful of the mushroom mixture until the chicken breast is full. Be careful not to overstuff as it may cause the meat to create an unwanted opening which will cause the cheese to leak out while cooking. Close the opening of the chicken breast with bamboo skewers. I cut the bamboo skewers in half in order to be able to use them.

Once all the chicken breasts are stuffed, place 1 tbsp olive oil, juice of 1 lemon and salt on one side of the chicken breasts. Turn over and add the same ingredients with the same amount to the other side of the breasts. Refrigerate overnight.


Turn on your oven broiler. Broil each side of the chicken for 10 minutes or when the breasts become light brown. Enjoy with rice, potatoes or pasta.

Add to Technorati Favorites

Samstag, 20. Dezember 2008

Lemonade Award


Last month, I received a very generous award from lovely Sandra, the blog owner of Get to know Croatia & Always Curious who is one of my first and most loyal readers.

Now it’s time for me to pass this award to other fellow bloggers. They all have wonderful blogs. I hope you will get a chance to visit them too.

You just need to give this award to 10 other bloggers and link them in your blog along with the person who gave you this award. Simple and easy.

1. Mimi Cooks-Wonderful Arabic cooking blog with great videos
2. Organically Cooked- Great blog from a New Zeland ex-pat who lives in Hania, Crete
3. Mediterranean Cooking in Alaska – Mouthwatering Mediterranean recipes all the way in Alaska
4. Lisa is Cooking - In her own words; an addict of cookbooks, food writing and cooking and other stuff related to food with lovely recipes
5. Joie de vivre: An amateur gourmet’s guide- Someone who has adopted a diet after reading “French Woman Don’t Get Fat” and lost quite a few pounds as a result of this book
6. Cinnamon Spice & Everything Nice –Again, more lovely recipes
7. Life Loves the Curious-A wonderful blog concentrating on Asian food
8. Passionate About Baking- If you love baked things, you must visit
9. Hommus and Tabbouli-Another blog concentrating on Mediterranean food
10. Zaayeka- A new blogger who has created a great blog only in two months!


Add to Technorati Favorites

Rice Pilaf with Carrots and Peas (Havuçlu ve Bezelyeli Pirinç Pilavı)

One of my favorite pilafs is with peas and carrots. Rice is so versatile; it can be cooked in different ways with various ingredients.

I use frozen peas for this recipe (the only frozen vegetable that I ever purchase) since good quality peas are not available fresh. Sometimes, I do find the large pods, but the peas inside are too small. If I could find good quality fresh peas, I would use them. My mother makes rice pilaf with carrots and peas pretty often. It is a good way of putting vegetables in starchy foods.


2 cups white rice
3 carrots (chopped in squares)
½ cup frozen peas
3 cups chicken broth
1 tsp olive oil
Salt

Heat olive oil in a pan. Add carrots and peas and mix together for 2 minutes. Add rice and mix again. Add the chicken broth and salt. Adjust the salt to your taste. Cook on medium heat until it starts boiling and then turn to low heat. Cook until all the water is absorbed. No need to stir while cooking. Serve with meat or vegetable dishes.

Add to Technorati Favorites

Dienstag, 16. Dezember 2008

Roast Lamb (Fırında Kuzu Budu)

One day I was strolling through the isles of a famous local fish and meat market when I was living in the Northeast and was trying to decide what type of lamb I should purchase. I saw an already marinated, packaged leg of lamb and was trying to figure out its ingredients. Another shopper informed me that she had tried it the week before and it was ‘out of this world’. I had to try it. It was excellent!

Now, I do buy the same leg of lamb, except without marinate since I prepare freshly made marinate. If cooked correctly, the lamb can be very tender and flavorful. I like my meat to be cooked thoroughly, but if you prefer it rare or medium rare, cook it a a few minutes less than instructed.

½ lb leg of lamb
1 large sprig of fresh rosemary
2 sprigs fresh oregano
3 cloves garlic (sliced)
Juice of 1 lemon or lime
1 tbsp olive oil
Ground black pepper
Sea salt

With a sharp knife, make 10-15 slits around the lamb. Place the lamb in a deep container. Rub with sea salt and freshly grounded black pepper. Start placing the sliced garlic in the slits on the lamb. Remove the leaves of rosemary and the oregano from the stems. There is no need to chop. Place the leaves of the herbs in the slits beside the garlic. Squeeze the lemon and add the olive oil. Make sure the lamb is coated with the lemon juice and olive oil. You may close the container and shake it up to make sure the ingredients mix together. Marinate in the refrigerator over night.

Preheat oven to 350º F. Place in a Pyrex dish and bake covered for 1 hour. Remove cover and cook for 15-20 minutes. Enjoy with rice pilaf or potatoes.

Add to Technorati Favorites

Samstag, 13. Dezember 2008

Leeks with Rice (Pirinçli Pırasa)

I have to admit that I do not know many recipes with leeks. My mother seldom cooked leeks. I do not recall her cooking it as the main dish but only as an ingredient for another recipe.

This dish is known in most parts of Turkey. This recipe is inspired from the Leeks with Carrots recipe from the Turkish cookbook called “Anatolian Feast” which is published by the American Turkish Association of Houston a non-profit organization.


4 medium leeks (sliced in ½ inch thick)
1 cup carrots (sliced thick)
1 red bell pepper (sliced lenghtwise)
2 garlic cloves (chopped)
1 cup rice
1 tsp tomato sauce
2 tbsp olive oil
½ tsp cumin
½ tsp ground black pepper
Pinch of salt
2 1/2 cups water

Wash the leeks thoroughly. Clean underneath each leaf with lots of water. There will be dirt sticking between the leaves. Therefore, after washing and slicing them, I soak them in a pot full of water and triple wash them.

Heat olive oil in a large pan. Add garlic and stir for one minute. Do not let them burn. Add leeks and carrots. Sautee for 3-4 minutes or until the leeks are soft. Add rice, tomato sauce, cumin, pepper and salt. Lastly, add the water. Stir well and cover the pot. Cook on low heat for 45 minutes. You may stir a few times during cooking to make sure the rice cooks well. Serve warm or cold as the main dish.

Add to Technorati Favorites

Dienstag, 9. Dezember 2008

Roasted Chestnuts (Kestane Kebabı)

A popular winter snack, chestnuts date back to pre-historic times. Mainly grown and consumed in the Mediterranean countries, chestnuts are a major staple in Southern Europe, Asia Minor, Southwestern and East Asia. They are also grown here in the States.

In Turkey, it is cultivated in the Marmara Sea region and the Black Sea region mainly in the mountainous areas. The most famous chestnuts (kestane) in Turkey is in the city of Bursa which is around the Marmara region. They grow in trees where the brown colored nut is enclosed in greenish spiny round burs. The nuts are harvested around October.

When I saw them in stores recently, my memory awakened for another joy of the winter. I grabbed a bag of the chestnuts and was looking forward to a cold night for roasting. I recollect seeing numerous chestnut carts in Turkey during winter months where the aroma of the roasted chestnuts fills the whole street. Resisting the temptation of the roasted chestnuts caused by inhaling the wonderful aroma is extremely difficult. The chestnut vendors can also be seen in the streets of Philadelphia and New York City during the winter months.

At home in Turkey, we used to roast them on wood fire which gives it a better taste. It has been years since I have had this experience. Since my visits to Turkey are always in the summer months, I have not had the chance to enjoy some of the roasted chestnuts over there. I compensate for it by roasting them myself in my oven. Although not the same, it does give a similar pleasure to the palates.

Chestnuts can also be boiled, cooked in food and used in a number of desserts. My favorite is though the roasted chestnuts. When the weather is cold and you feel like hanging out at home with family, roast some chestnuts and enjoy them warm.


1 lb chestnuts

Heat oven to 350º F. With a sharp knife, cut an X on the back of each chestnut. See picture below.


Arrange chestnuts on oven tray and roast until all the chestnut open up and the flesh of the chestnuts is exposed.

Let them cool to make sure you do not burn yourself. Peel and enjoy warm.

Add to Technorati Favorites

Freitag, 5. Dezember 2008

Borek with Ground Beef (Kıymalı Börek)

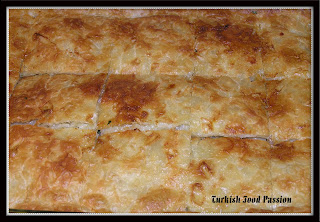
I made and took this borek for the last day of our Spanish class. Everyone was supposed to bring Mexican or Spanish food for the cultural experience, however I was volunteered into bringing Turkish food. I prepared it late on a Sunday night and the next day I left work early and placed it in the oven while I was getting ready. We took it to class warm, just out of the oven. The smell of it was very tempting. It got a lot of praise. This was my first time making this borek and I will make it again soon, this time for us.


For the Filling:

1 lb ground beef
1 medium white or yellow onion (chopped)
2 cloves garlic (chopped)
½ cup parsley (chopped)
1 tbsp olive oil
1 ½ tsp salt
¼ tsp paprika
½ tsp ground black pepper

For the Outer Part of the Borek:

1 package phyllo dough sheets
1 cup yogurt
½ cup olive oil
1 egg

Preparation of Filling:

Heat olive oil in a large non-stick pan. Add the onions and sautee for 3 minutes. Add the chopped garlic and the ground beef. Cook until the beef takes a brownish color stirring constantly. Add the parsley, salt, black pepper and paprika and sautee for 2 more minutes. Remove from heat and set aside.

Putting All Ingredients Together:

In a deep bowl, add the yogurt, olive oil and egg. Mix vigorously until all three ingredients are mixed well.

Using a brush, spread a small amount of this newly created mixture in a large Pyrex dish. This is to prevent the Phyllo sheets sticking to the Pyrex dish.

Open the Phyllo dough package. Place a damp cloth on top so that the Phyllo sheets do not dry out. The Phyllo dough sheets can be found in the frozen section of most markets. These are the same dough sheets that are used for baklava.

Place one sheet of the Phyllo dough in the Pyrex dish on top of the yogurt, olive oil and egg mixture spread. Dip your brush in this mixture and brush the Phyllo sheet. Do this one by one until half of the Phyllo sheets are used up. (Some people brush the yogurt-olive oil-egg mixture on every 3-4 Phyllo sheets, but I have found that it turns out better if you do it one by one). After you have layered half of the phyllo dough, spread the meat filling on top of the Phyllo dough. Add another sheet of the phyllo dough and butter it. Continue the process of brushing each Phyllo dough sheet and placing them on top of each other until all the Phyllo sheets are used up. If you have any of the yogurt-olive oil-egg mixture left over, pour it on top and spread it evenly with a brush.

Bake at 350º in the middle rack of the oven for 40 minutes. Serve warm or at room temperature.
---------------------------------------------------------------------------------------------
Let's Have Some Fun!
A couple weeks ago, I was tagged by Pixen. As a result of being tagged, I am supposed to reveal 7 facts about myself and tag 7 other bloggers. I had previously been tagged through e-mails but these things never got my interest, so I have never followed up. I will however follow up with this one. Here we go…7 facts about myself:

1. I never thought I’d ever have so much interest in cooking when I was young. I always thought my mom would be cooking for me for the rest of my life. Although, if I had lived in Turkey, she probably would. My mom’s food would be great but, I am also very pleased with discovering my new hobby.

2. Snakes? Keep them away; I have a snake phobia which developed in the past couple years. I cannot even stand to see a snake on TV. Therefore, I cannot spend any time in forests hiking during the summer, something I really used to enjoy. I am even getting goose bumps right now just as I write these words involving the S…. word!

3. The first and only time I flew to Turkey with a non Turkish Airlines was when I was a student and that airline offered options for a meal. Just out of curiosity, I ordered the “muslim dinner” (whatever that was supposed to mean) and I was so disappointed even though I didn't know what to expect. Not to mention, my food tray came much earlier than everybody else’s! It was weird.

4. I love reading, but I only read non-fiction books. I do not remember the last time I read a fiction book. Maybe I take life too seriously, but I like to learn things when I read. I know that kind of takes the fun out of it... Although, I enjoy learning.

5. I used to work with someone who did not even own a stove because she thinks cooking is a waste of time! (I know this is not a fact about me, but it’s a fact that I knew this person) Does that count?

6. I have written some things in the past with the intention of creating a book, but I lost interest and left it alone. Not sure if I’ll get back to it, but I also found out that I like writing poems.

7. I am more of a listener than a talker. Although if you ask my husband, he’ll probably tell you just the opposite. I have to admit, he may be right sometimes.

Here are the 7 bloggers I am tagging (I won’t be offended if you do not play, but I hope you have some fun):

Get to know Croatia
Mimi Cooks
Organically Cooked
Cinnamon Spice & Everything Nice

The Rules for Being Tagged:

1. Link to the tagger (my blog) on your blog
2. Reveal 7 facts about yourself
3. Tag 7 other bloggers, list their blogs and let them know they have been tagged
4. Have fun!

Add to Technorati Favorites

Sonntag, 30. November 2008

Stuffed Peppers with Chicken (Tavuklu Biber Dolması)

The first thing that came to my mind when I saw these peppers at the farmer’s market was “Stuffed Peppers”. The bell peppers were perfect for stuffing as they were small. Most of the bell peppers we see at regular markets are oversized and not a perfect fit for stuffing. I was very pleased.

A variety of stuffing can be used for this dish. If interested in different stuffing recipes, please see my Stuffed Grape Leaves with Olive Oil (Zeytinyağlı Yaprak Sarması) and Stuffed Mixed Vegetables (Karışık Dolma) recipes under Stuffed Dishes category. Currently, I only have two, but this list will grow eventually.

This dish uses ground chicken in the stuffing. My mother sometimes uses chicken instead of beef for stuffing dolmas. It really gives it a great taste. This is the first time I used chicken for dolmas myself and I am sorry I had not used it all this time.

Now let’s get to the recipe. It is not as complicated as it looks and does not consume a lot of your time. Give it a try and you will love it! No question.


Vegetables:

15 small bell peppers (you may also use eggplants, zucchinis or tomatoes)

For the Stuffing:

1½ cups short grain rice
1 lb ground chicken
½ cup chopped fresh parsley
¼ cup chopped fresh mint
1 large chopped garlic clove (or 2 small ones)
Juice of 1 lime
½ chopped onion
1 tbsp tomato paste
2 tbsp red pepper paste
3 tbsp olive oil
1 tsp cumin
1½ tsp salt
1 tsp ground black pepper

For Cooking the Pepper Dolmas:

1 large sliced garlic clove
1 lime
2 sprigs of mint
1 tsp salt
2 cups water

Mix all the ingredients for stuffing with your hands to make sure all the ingredients are integrated. Set aside. I always use first aid gloves for this as I do not want to make my hands take different colors.

With a sharp paring knife, cut square on the top portion of the pepper and remove the stems from the peppers. Then remove the seeds. Do not discard the stem that you removed as it will be used as a cap for the peppers after they are stuffed.


Stuff each pepper up to the top but leave a 1/2 of an inch of room so that when the rice expands after cooking, it will have room.

Close with the pepper cap your removed earlier.


Arrange in a large pot.


Once all the peppers are stuffed, sprinkle the peppers with salt. Squeeze the lime on top of the peppers, throw in the sliced garlic and the mint. Add the water and place two-three small plates to add weight on the peppers so that they stay compact. Cover and cook on medium heat for 30 minutes. Turn the heat to low and cook another 30-40 minutes. After turning the heat off, keep the lid closed for about 15 minutes so it still continues cooking with the heat inside the pot. Serve warm along with yogurt or cacık.


Add to Technorati Favorites

Mittwoch, 26. November 2008

Thai Style Shrimp with Oyster Mushrooms

A while back I bought a Thai cookbook and got really Thai food frenzy. I purchased any kind of Thai sauces and pastes that I could find in stores without thinking about the recipes I will be making which I admit was not very wise. I was experimenting cooking Thai food at home and my husband was experimenting eating it! He was not very open to different foods before we got married. Now, he loves trying foods from all around the world. Those Thai recipes from the cookbook were really good. I rarely attempted to divert from the cookbook as I was not very familiar with cooking Thai food. Now that I am still left with some sauces and pastes and other stuff, I am creating new dishes employing Thai ingredients. Sometimes they work, sometimes they do not.

This shrimp dish with oyster mushrooms turned out pretty well. Therefore, I am sharing it here. It is simple, yet delicious. I used the oyster mushrooms and the scallions I bought at the farmer's market. The spiciness may be lacking, but I did not have any chilies on hand. Feel free to add them.


1 lb jumbo shrimp
¾-1 lb fresh oyster mushrooms
2 large scallions (chopped)
2 red chilies (optional)
5 leaves of basil (preferably Thai basil)
2 cloves garlic (sliced)
1 tsp dried basil
1 tbsp fish sauce
2 tbsp canola oil
Thai ginger peanut sauce
1 tsp salt

Cut the mushroom cluster in a way where each piece will have 3-4 of the mushrooms attached. Chop the chilies if you choose to add some spiciness to the recipe. Salt the shrimp. Heat the oil on medium heat in a large pan. Add the garlic and chilies. Sautee for 3-4 minutes, add the Thai ginger peanut sauce and the fish sauce to the garlic. Stir and add the mushrooms. Cook for 2 minutes before adding the shrimp. Add the dried and fresh basil. Stir for 3 minutes and add the scallions. Allow 2 minutes to cook after adding the scallions. Serve with plain rice. Garnish with fresh basil and red chilies if you wish.


Add to Technorati Favorites

Samstag, 22. November 2008

Farmer’s Market Salad with Turkish Dressing


I am taking a break from regular Turkish food recipes and posting the dishes I made using the vegetables I purchased from the Farmer’s Market last weekend. Let’s start with a salad. This salad incorporates mizuna; a peppery mild salad green with feathery leaves, escarole, red and white radishes, tomatoes and green onions (all purchased from the local farmer’s market). I could have also added cucumbers that I bought at the market but we ate them before the salad was made. If you have them on hand, definitely throw them in.

I had never tasted mizuna or white radishes before. As the name suggests, mizuna is a Japanese salad green and used mainly for salads, but can also be used in soups and noodles. I enjoyed the taste of this green, healthy vegetable. Red radishes are very common in Turkish salads, however not white ones. One noticeable observation was that the red radishes are white inside and the white radishes are red inside. That got my attention, but also created a colorful appearance to my salad.

The integration of all these veggies with the classic Turkish dressing was a perfect match. I will be making this salad again.

20 escarole leaves
20 mizuna leaves
4 white radishes
6 red radishes
3 tomatoes
3 green onions
2 tbsp olive oil
3 tbsp vinegar
1 tsp salt

Chop the escarole and mizuna leaves and place in a large bowl. Cut the radishes in half and slice. Slice the green onions and chop the tomatoes. Add to the bowl. Sprinkle salt. Add olive oil and then the vinegar. Toss and serve.

Add to Technorati Favorites

Dienstag, 18. November 2008

Adana Kebab (Adana Kebabı)

Adana kebab comes from the city of Adana located in Southern Turkey. It is the fifth largest city of Turkey and very rich in food culture. Aside from kebaps, it is also famous for other types of scrumptious food.

Adana kebab consists of ground lamb (beef may also be used but original Adana Kebab is made with ground lamb) and various spices. Skewers of minced meat are created using long wide skewers and grilled on a charcoal grill. Adana kebab is served with an onion salad called “zerzavat” on a bread similar to pita. If you only had a chance to try this bread, you would certainly love it. Unfortunately, I have not seen this bread here in the States with the same taste acquired in Turkey. I think the reason for that is that this bread is cooked in a special oven made from clay using wood fire in Turkish bakeries. The bread is thin, long and oval shaped. If you are familiar with Turkish bakeries, you probably know what I am talking about. Just passing by a Turkish bakery will make you hungry due to all the aroma filled in air.

One can find many different versions of Adana kebab in Turkey as well as abroad; however, I can assure you that the best one is made in Adana, Turkey. When you go to a Turkish restaurant, you will most likely see Adana kebab on the menu. It may not be as good as Adana’s original kebap, but it will still be very good. If you feel like making Adana kebab at home, here is a recipe (my version).


1 lb ground beef or lamb
3-4 cloves of garlic (chopped finely)
½ cup parsley (finely chopped)
½ small white or yellow onion (chopped finely)
1 tsp cumin
1 tsp paprika
1 tsp ground black pepper
1 ½ tsp salt

10 bamboo skewers
6 green cubannelle peppers
6 roma tomatoes

Mix all the ingredients and knead for 5 minutes to make sure all the ingredients are mixed well. Let the meat sit over night in the refrigerator or for a few hours. Soak the bamboo skewers for 30 minutes prior to cooking the meat. Take an egg sized amount of the meat and place on the skewer and keep pressing so that the meat occupies 3/4s of the skewer evenly.


Heat the oven broiler and place on a pan that allows dripping. Cook the meat for 5-6 minutes on each side. Serve with rice pilaf, grilled/broiled green peppers and tomatoes. You may also serve inside flat bread (i.e. pita) with zerzavat which is an onion and parsley mixture.

Zerzavat (Onion Salad):

2 red onions
¼ cup fresh parsley (chopped finely)
1 tsp sumac
½ tsp salt
Lemon wedges

Cut onions in half lengthwise. Slice thinly. Add the sumac and parsley and mix well. Add salt just before serving so that they do not become soggy. If you like it with lemon, squeeze one of the lemon wedges on top.

Add to Technorati Favorites

Samstag, 15. November 2008

Saturday Produce Shopping

As I went to bed on Friday night, I had planned to get up early and go to the local farmer’s market on Saturday morning. The farmer’s market is literally 2-3 minutes away from where I live. A couple years ago, I had visited this farmer’s market when I used to live a little further; about 10-15 minutes away, however I was very disappointed with the limited number of stands and produce. With that disappointment, I never went there again. Although since I moved closer, I have been meaning to check it out again, but for 2 years now I have not, even though I am only a couple blocks away.

This week I was conversing with a coworker who has a farmer friend who brings his vegetables to the local farmer’s market. This reminded me again about the farmer’s market and motivated me a little more to go there. The farmer’s market is open between 8 a.m.-12 p.m. on Saturdays and 3p.m.-7 p.m. on Wednesdays. Wednesdays never work for me as I am beat after a long work day and feel like only going home and just relaxing.

While curled up in bed reading late on Friday night, I realized how exhausted I was and not sure if I could make it to the farmer’s market in the morning. I wanted a good night sleep. I woke up around 9:00 a.m. on Saturday morning after a good night sleep with no disruptions, but I still felt tired. I decided to forget the farmer’s market and continue sleeping! That’s what I did. Then, I woke up again just before 11:00 a.m. and still felt tired. This time though, I knew I could not fall asleep again. Rolling out of bed was a little easier this time. I got ready and drove to the farmer’s market as my husband was still in bed!

With the cool, crisp air outside, I would have liked to walk there, but I was not sure I could carry all the bags of produce. When I arrived there, I had a shock when I saw the crowd, the variety and abundance of fruits and vegetables and other stuff. They had grown tremendously since I had visited the market 2 years ago. I realized how much I had missed all this time living just a couple blocks away from it!

There was a lovely band playing nice music so people could listen to while shopping. A very enticing coffee stand was around the corner and you could buy a cup of coffee with free refills. I never get refills as one cup of coffee is plenty for me, but it is nice to know free refill is available. You could buy bags of your favorite coffee. A good variety from light to strong coffee from different countries existed. If you prefer, they grind it for you. After sampling a cup, I did get some of that coffee.

The farmer’s market also carried soap bars, desserts, breads, flowers stands and some other stuff. I only purchased produce though.

I found the perfect small bell peppers which are very suitable for stuffed peppers. Usually it is difficult to find small bell peppers here in the States. In Turkey, we use them for stuffing. I was preparing this week’s menu in my head as I was sipping my coffee and strolling through each stand. There were also very nice looking oyster mushrooms which I have not decided how to cook. They looked too good not to buy. I also found radishes, lettuce, tomatoes, cucumber, salad greens, grapefruit and persimmons full of vitamins. As I am very health conscious, this shopping experience at the market made me very happy. I do purchase a lot of vegetables and fruits in my local supermarket too. In fact, on many occasions other customers have commented on how I have only healthy stuff in my cart. My cart lacks any kinds of sodas, preserved, frozen, canned foods, as well as junk food. The only thing that I cannot resist to buy at any market is chocolate.

The prices at the market were a little more expensive than where I usually shop, but definitely worth it. The farmer’s produce is brought from their farm to the market the same day. The supermarket where I do my weekly shopping does also buy produce from local farmers which I enjoy. Their prices are a little expensive compared to other stores, but they do support local farmers. It looks like I will be visiting the farmer’s market weekly from now on.

I came home happy with all my shopping. I spread all the produce on the counter and took a few pictures. Maybe I have more pictures than needed, but the produce is so colorful and beautiful, I couldn’t send the pictures to the recycle bin. These looked to good to pass up and not write about on my blog. I had to share. It looks like there will be lots of veggie dishes in the menu this week. I will post the recipes on my blog in future dates.

Freitag, 14. November 2008

Sauteed Okra (Sotelenmiş Bamya)

Have you ever eaten okra? For those of you who have not eaten okra, you are missing out! Okra is made of a green pod that contains small seeds and a gooey substance. The dislike of okra by some people can be explained by the mucilage (sticky juices) that is stored inside each pod as well as the soft texture of cooked okra.

My husband is one of those people who hate okra. He is not a picky eater, but since he was very little, he says he hated okra. The reason for this hatred towards okra is due to its soft texture attained after being cooked in a stew. I do purchase okra every once in a while. Each time, he eats just a little bit of it.

Okra is a very common vegetable in Turkish cuisine. It is cultivated in areas with warm temperatures. In Southern Turkey, I have seen vast fields of okra as the temperature there is very suitable for growing this vegetable. Also, it is very easy to find okra in Southern of the U.S. In fact, while living in the Midwest and the Northeast for so many years, I do not recall seeing this vegetable up there. It was very pleasing to be able to find okra and so many other veggies and fruits here in Southern part of the country.

In Turkey, okra is usually cooked with tomato sauce as a stew and that is my favorite. Okra can also be fried, grilled and sautéed. This recipe is very simple and does not take a long time to cook. It is perfect for a work night.

¾ lb okra
1 small yellow onion (sliced)
2 tbsp olive oil
1 tsp ground black pepper
1 tsp paprika
Pinch of Salt

Wash and drain the okra. Peel the stem of the okra in the shape of a cone rather than cutting it flat. If you cut the head of the okra flat, the mucilage of the okra will come out and make it mushy while cooking. Heat olive oil in a non-stick pan. Add the okra and sautee for 5 minutes stirring continuously. Add the sliced onion, the ground black pepper, paprika and salt. Sautee for another 5-10 minutes until the okra is slightly soft, but also crunchy. Serve warm with rice pilaf.

Add to Technorati Favorites

Montag, 10. November 2008

Red Lentil Fingers (Mercimekli Köfte)

This dish is made all over Turkey and served as an appetizer, main course, side dish and as an afternoon snack. My first attempt to make this dish was not successful. Neither were my second or third attempts. The reason is because you have to get the measurement of water, lentils and bulgur just right. If you make this recipe and it turns out runny, just put it in the oven for 10-15 minutes before adding the green onions and parsley. You may even use the microwave instead of oven. This is what I did when I encountered this problem during my prior attempts and it worked perfectly.

During grad school, the Turkish professor at the university used to make these lentil koftes when she invited the few Turkish students to her house. They tasted so good. I loved them so much that I couldn’t help but fill up on these koftes while other excellent foods were waiting to be eaten.

If you ever feel like having a light lunch or dinner, these are very easy to make. This finger food also can be perfect for taking to a pot luck dinner. Wrap in lettuce leaves and enjoy!

2 cups red lentils
2 cups bulgur (fine grind)
5 ½ cups water
2 bunches green onions (chopped)
1 cup fresh parsley (chopped)
½ - ¾ cup olive oil
2 tbsp tomato sauce
2 tbsp red pepper paste
1 ½ tsp salt

5-6 leaves of romaine lettuce

Wash the lentils and place in a large pot with water. Cook on medium heat until the red lentils are cooked and soft. Usually about a half hour should be sufficient for the lentils to be soft. Add the bulgur to the lentils, mix thoroughly and cover for a half hour. The bulgur will become soft from the moisture in the pot. The mixture of the lentils and bulgur will thicken. Place in a deep bowl and let it cool.

In the mean time, heat the olive oil in a pan. Add the onions and sautee or 2-3 minutes until soft. Add the tomato paste, red pepper paste and stir until the pastes dissolve. Add the parsley and stir for 1 minute. Pour this sauce on the lentils and bulgur. Sprinkle the salt on it. Once the oil cools, knead the contents of the bowl. Mix thoroughly to avoid lumps and to make sure ingredients are integrated well.

Prepare a large plate and place the lettuce leaves on it. Pull an egg sized amount of the mixture, hold it in your palm and press it gently with your fingers. Place it on the lettuce bed. Keep doing this until the lettuce bed is covered with the lentil fingers. You may create a lettuce wrap with the red lentil fingers by placing a red lentil finger in a lettuce leaf and wrapping it. Serve at room temperatures.

Tip: Whenever I make any food that involves kneading or mixing with hands, I use gloves to protect my hands and nails. If you knead bulgur dough that involves tomato or red pepper paste, your hands will take a reddish color. Therefore, I started using regular gloves that are used for First Aid or the ones you see at your doctor's office. At first they may feel uncomfortable to cook with, but they do help protect your hands and nails. I think they come in one size so if your hands are small, the gloves may not fit well. In this case, I tie them at the wrist so they fit correctly.

Add to Technorati Favorites

Dienstag, 4. November 2008

Chicken in the Pot (Tencerede Tavuk)


1 ¾ lb skinless boneless chicken thighs
1 lb cherry tomatoes
1 large red bell pepper (sliced lengthwise)
5 small white potatoes (quartered)
½ lb cremini mushrooms (cut in half)
1/3 lb pearl onions
5 garlic cloves
7 sprigs fresh oregano
2 sprigs of fresh rosemary
3 tbsp chopped fresh parsley
2 tbsp olive oil
1 ½ tsp sea salt
1 tsp ground black pepper

Heat olive oil in a large pan. Add the chicken. Turn the chicken pieces over when they take a brownish color. Sprinkle some salt and pepper on both sides of the chicken. Feel free to adjust salt and pepper according to your liking after adding the rest of the ingredients. I always taste the food before deciding if it needs more salt or not. Add potatoes, pearl onions, red bell pepper and mushrooms. Stir all the ingredients in the pot. Cook for three minutes and add the rest of the ingredients except parsley and stir again. Cover pot and cook for 50 minutes on low heat. Turn the heat off and add parsley to the pot and cover again for five minutes. Remove the fresh oregano and rosemary sprigs before serving.

Samstag, 1. November 2008

Bulgur Pilaf with Almonds and Pine Nuts (Bademli ve Çamfıstıklı Bulgur Pilavı)

Bulgur is a versatile staple in Turkey which is cooked in pilafs and many other dishes such as Stuffed Bulgur Shells, Bulgur Salad (Kısır) similar tabouleh and etc. Bulgur pilafs are widely consumed in Turkey using very diverse ingredients. This is another dish that comes from the times of the Ottoman Empire era.

Bulgur pilafs are usually served with meats, vegetables and stews. Using your creativity, it is very possible to create numerous bulgur pilaf recipes. This recipe is using bulgur pilaf with almonds and pine nuts which are common ingredients for pilafs.

2 cups bulgur (medium grain)
1/3 cup pine nuts
1/3 cup slit and peeled almonds
4 cups water
2 tbsp olive oil
Pinch of salt

Heat olive oil in a medium pot. Add the slit and peeled almonds along with the pine nuts. Sautee until both the pine nuts and the almonds take a brownish color. Add the bulgur and sautee 2-3 minutes. Add the water and salt. Adjust the salt to your liking. Cook on medium heat until the water boils. Once the water boils turn the heat to low and simmer until the water of the bulgur is evaporated (about 20 minutes).

Montag, 27. Oktober 2008

Portobello Mushroom Sautee (Sotelenmiş Portobello Mantar)

2 large Portobello mushrooms (sliced)
2 green bell peppers (sliced)
1 red onion (sliced)
1 tbsp olive oil
Salt and ground black pepper

Heat olive oil in a large pan. Add the mushrooms and sautee for 3-4 minutes. Add peppers and sautee 2 more minutes. Finally, add the onions along with salt and pepper. Serve as a side dish or a main dish if you prefer.

Samstag, 25. Oktober 2008

Broiled Flank Steak

I got introduced to flank steak by my uncle who very often turned on his grill and grilled different kinds of meats and vegetables after he got back from work, even on snowy, cold days. He grills everything from asparagus to shrimp. He marinates the flank steak differently than I did in this recipe.

Flank steak is actually a long muscle that is located in the belly of a cow, below the rib cage. It is very lean and is tougher than other meat cuts. If cooked correctly, it can be quite tasty and flavorful. Avoid cooking the steak too long as it will become hard and chewy. I don’t believe this part of the cow is eaten in Turkey, but times have changed, I could be wrong.

1 lb flank steak
¼ white onion
2 garlic cloves
5-6 sprigs parsley
1 tsp Dijon mustard
½ cup olive oil
2 lime juices
½ tsp oregano
½ tsp paprika
½ tsp ground black pepper
1 ½ tsp salt
1 tbsp chopped parsley for garnishing


Vegetables For Serving:

4 long green peppers
1 large tomato (quartered)
1 onion (quartered)

Let’s start with a delicious marinate. Except the steak, place all the ingredients in a food processor or a blender. Puree the all the ingredients. You may adjust the salt and pepper based on your taste. Place this newly created marinating sauce in a large bowl, on top of the steak. Make sure the sauce touches every part of the steak. Refrigerate 24-48 hours. Before cooking, remove from fridge and let sit in room temperature for 30 minutes. Heat the oven broiler or a grill if you have an outside grill. If broiling, put the steak in a Pyrex dish and place on the top rack of the broiler. Sometimes when I can afford longer cooking time, I place it under the 2nd top rack. Keep the broiler slightly open when broiling to avoid any fire dangers. Cook each side of the steak for 7-8 minutes depending on how you like it cooked. If you like it rare, I would cook it less than that, put I prefer my meat cooked medium well to well, so usually I can acquire that level within 7-8 minutes. Again, if you’re using the 2nd top rack, it will take longer to cook.

For Broiling the Veggies:

Place all the veggies in a large tray. The soft parts of the tomatoes should be up and the skin side down. Sprinkle some salt on the onions and tomatoes. Broil until the skin of the peppers are blackened. By that time, the tomatoes and the onions should be ready too.

Slice the steak thinly against the grain of the meat, garnish with parsley and enjoy with potatoes or rice.

Montag, 20. Oktober 2008

Fish Sandwich (Ekmek Arası Balık)

These sandwiches are perfect for a quick, week night dinner after work. Preparation takes less than 30 minutes. You may substitute the bread based on your preference.

2 lemon sole filets
1 baguette bread
1/2 of red onion
½ tsp sumac
3 tbsp chopped flat leaf parsley
1 small cucumber (sliced)
2 roasted long green peppers (peeled & seeds removed)
1/2 avocado (sliced)
½ cup thinly sliced romane lettuce
1-2 tbsp olive oil
½ lime
Mayonnaise
Salt and pepper

In a large Pyrex dish, place the fillets of fish. Sprinkle salt and pepper on both sides of the fish. Drizzle the olive oil and squeeze the lime on both sides. Broil each side for 4-5 minutes.

While the fish is cooking, cut the baguette in 3 equal pieces one of which will not be used since we will make only two sandwiches. Cut the middle of the bread pieces lengthwise without detaching the back. Set aside.

Now, it’s time to prepare the onion mixture. Slice the onion thinly. Add the sumac, parsley and a pinch of salt to the onions. Set aside.

Open up the bread and spread mayo on both sides of the bread. On the bottom part of the bread, add the fish; one fillet to each piece. You will need to cut the fish lengthwise since the baguette is thin. I use French baguette since it tastes very similar to Turkish bread. Add the cleaned and peeled peppers; one pepper to each sandwich. Add the onions, sliced avocados and cucumbers and the lettuce to the sandwiches. Cut in half and serve with sliced cucumbers and tomatoes sprinkled with salt.

Dienstag, 14. Oktober 2008

Fennel in Olive Oil (Zeytinyağlı Rezene)

One of the most healthy and nutritious vegetables, fennel has a crunchy texture and aromatic flavor. Fennel comprised of a white bulb with layers, green stalks similar to celery and feathery leaves similar to dill. This vegetable has very powerful amounts of antioxidants, calcium, iron, magnesium, potassium, Vitamin C and many other nutrients. It has been used in cooking since ancient times in the Mediterranean region. Its medicinal uses are not limited to digestive disorders, anemia and respiratory disorders. There are numerous health benefits to this tasty aromatic vegetable.

A few years ago, when I was developing my new interest in cooking, I found this vegetable that was not familiar to me previously at a market. Not knowing what to do with it, I bought it anyway as I love discovering new things. With the suggestion of a friend who was visiting, we cooked it in olive oil. That was my introduction to fennel. Since then, I’ve managed to create different types of recipes with this vegetable.

This particular dish was one of our survival foods during Huricane Ike. While expecting Ike to hit the coast of Galveston, we were aware of possible power outages and food going bad in the refrigerator. I decided to cook some of the veggies that I had on hand that could survive to be in the fridge for some time after the power goes out. I had a large bulb of fennel sitting in the fridge, so I cooked it in olive oil. It lasted 3-4 days and did not go bad without refrigeration.

My husband was teasing me that even in the aftermath of the hurricane we were eating “fancy” food. He was lucky that we did not have to resort to his canned food that he lived on when he was single. Thankfully, we had enough of good food for almost a week which was equivalent to the time we were without water and power. We were also lucky to have good friends who received power and water way before we did and who were very welcoming in their home when we used their showers and ate their food. Thank you Selma and Selim.

1 large fennel bulb
¼ white or yellow onion (chopped)
2 cloves garlic (chopped)
½ lime
2 tbsp olive oil
Pinch of red pepper flakes
Pinch of ground black pepper
Pinch of salt

Cut the fennel bulb in half and slice each half. Heat the olive oil and add the onions and garlic. Sprinkle the red pepper flakes. When the onions and garlic are soft, add the sliced fennel bulb. Add salt and pepper. Squeeze a half lime on top and sautee for 3-5 minutes. Serve as a warm or cold side dish.

Samstag, 11. Oktober 2008

Damascus Dessert (Şam Tatlısı)

Şam Tatlısı is a wonderful, syrupy dessert made of semolina (farina) that deserves some praise. The name ‘Şam Tatlısı’ literally means ‘Damascus Dessert’. It is widely known in Southern Turkey and eaten all around the country.

When I was a kid, there was a man who used to pass by our neighborhood trying to sell this dessert in a cart yelling “Şam tatlısıııııııııı. Şam tatlısıııııııııı”. Every time he passed by and we heard his voice, I and the other kids in the neighborhood would call our moms to buy us Şam tatlısı. My recollection of the Şam tatlısı he sold is just out of this world. His dessert was neatly cut in rectangular shape and topped with one or two peanuts on each piece. To this day, I do not know if the dessert was home-made or if he purchased it commercially and resold it. In any case, it was delicious.

I am grateful that my mother also makes an unbelievable Şam tatlısı which I had plenty of when I visited home this summer. She gave me the recipe which I had a great difficulty making correctly. I also tried my mother in law’s recipe a few times which did not help me either. After 5-6 failing attempts trying both recipes that were given to me more than once, I finally managed to make it! It worked. Not as good as my mother’s or the cart man’s but it was pretty good! Both my husband and I were excited like kids when it worked. My husband has a weakness to dessert which hinders me from making dessert too often so that he does not gain weight and clog his arteries! If I let him, he finishes the whole thing in a couple of days. Usually, I end up taking most of it to work or send it with him to his work. Hopefully he really shares with his co-workers rather than eating it on his way to work. But in any case, people always appreciate free dessert!

I also shared my joy of finally being able to make this wonderful dessert with my dear friend Brenda who is a dessert addict. She was waiting for me to get this dessert right, so that she could make it and take it to one of her endless social activities. After successfully making the dessert a couple weeks ago, I informed her that I would post it on my blog in a few days. After bringing the city of Philly upside down, she was able to find semolina (farina) and ready for the dessert, but apparently my blog did not have the recipe posted as promised. I read an e-mail from her the next morning complaining to me that she wanted to make the dessert the night before but the recipe was not on my blog! Since my recipe was ready, I e-mailed it to her immediately and finally I am able to post it the blog! Thanks Brenda for following and actually making my recipes.

Note: After I posted this recipe and blogged about it, I found out Brenda's adventure with this dessert. Even though I said she brought the city of Philly upside down and found semolina (farina), she informed me this afternoon that she had bought the wrong thing! She bought the small, round semolina pasta. She got suspicious when she was making the dessert as it did not become smooth and the cake looked pretty different when she took it out of the oven. She checked it out on Wikipedia and confirmed her suspicion. I had a great laugh when I heard this and had to add this paragraph to what I wrote previously. Hopefully her next attempt to make Şam tatlısı will be better...

With the great help of technology, I always set my recipes on automatic posting for the next month, but this one will not wait. Desserts cannot wait. Here it is...

2 cups semolina
1 tbsp flour
1 cup ground sugar
1 cup plain yogurt
1 tsp baking soda
2 tsp baking powder
1 tsp vanilla extract
1 small lemon rind
½ tsp cinnamon
4 tbsp ground raw pistachios (for decoration)

For the Syrup:

2 cups water
2 cups ground sugar
1 tbsp honey
1 tsp fresh lemon or lime juice

First prepare the syrup. Place the water and sugar in a small pot. Stir and cover. When the water and sugar mixture boils, add the honey and the lemon/lime juice. Boil 1-2 minutes and remove from heat. Cool.

Add all the above ingredients for the cake. Whisk all the ingredients in a large bowl until you obtain a smooth mixture. Allow the mixture to relax for 20 minutes.

Preheat oven at 350º F. Grease a Pyrex dish with butter. Pour the mixture into the Pyrex dish and bake for 35 minutes. This may vary depending on the oven you are using, but make sure the top takes a brownish color before removing it from the oven. Start checking it after 25 minutes of baking.

Remove from the oven and slice diagonally, in squares or rectangles. Pour the cooled syrup on the hot cake. Make sure that the syrup is cooled and the cake is hot.

Sprinkle with ground pistachios, walnuts or place whole peanuts, filberts or almonds on each piece. If you choose to place peanuts, filberts or almonds, do this before putting the cake in the oven.

Enjoy cold.

Note: You may also place the nut mixture in the middle of the cake as a layer. In this case, pour half of the cake mixture in the Pyrex dish, sprinkle with 1 cup of ground nuts (either pistachios or walnuts) and then pour the rest of the mixture over it. This is the way my mother-in-law makes it and it can also be very delicious.